You know that feeling when you’re handed a feeding tube care routine and suddenly every step feels like it carries life-or-death weight? That’s normal. How to clean a feeding tube isn’t just about hygiene, it’s about preventing infections, blockages, and unnecessary hospital visits. Whether you’re caring for a loved one at home or just learning the ropes, getting this right matters more than most people realise.
Per CDC guidelines on enteral feeding, proper cleaning cuts infection risk by nearly half. The good news is the process is straightforward once you have the right supplies and a solid routine. Let’s walk through it step by step, so you feel confident every single time.
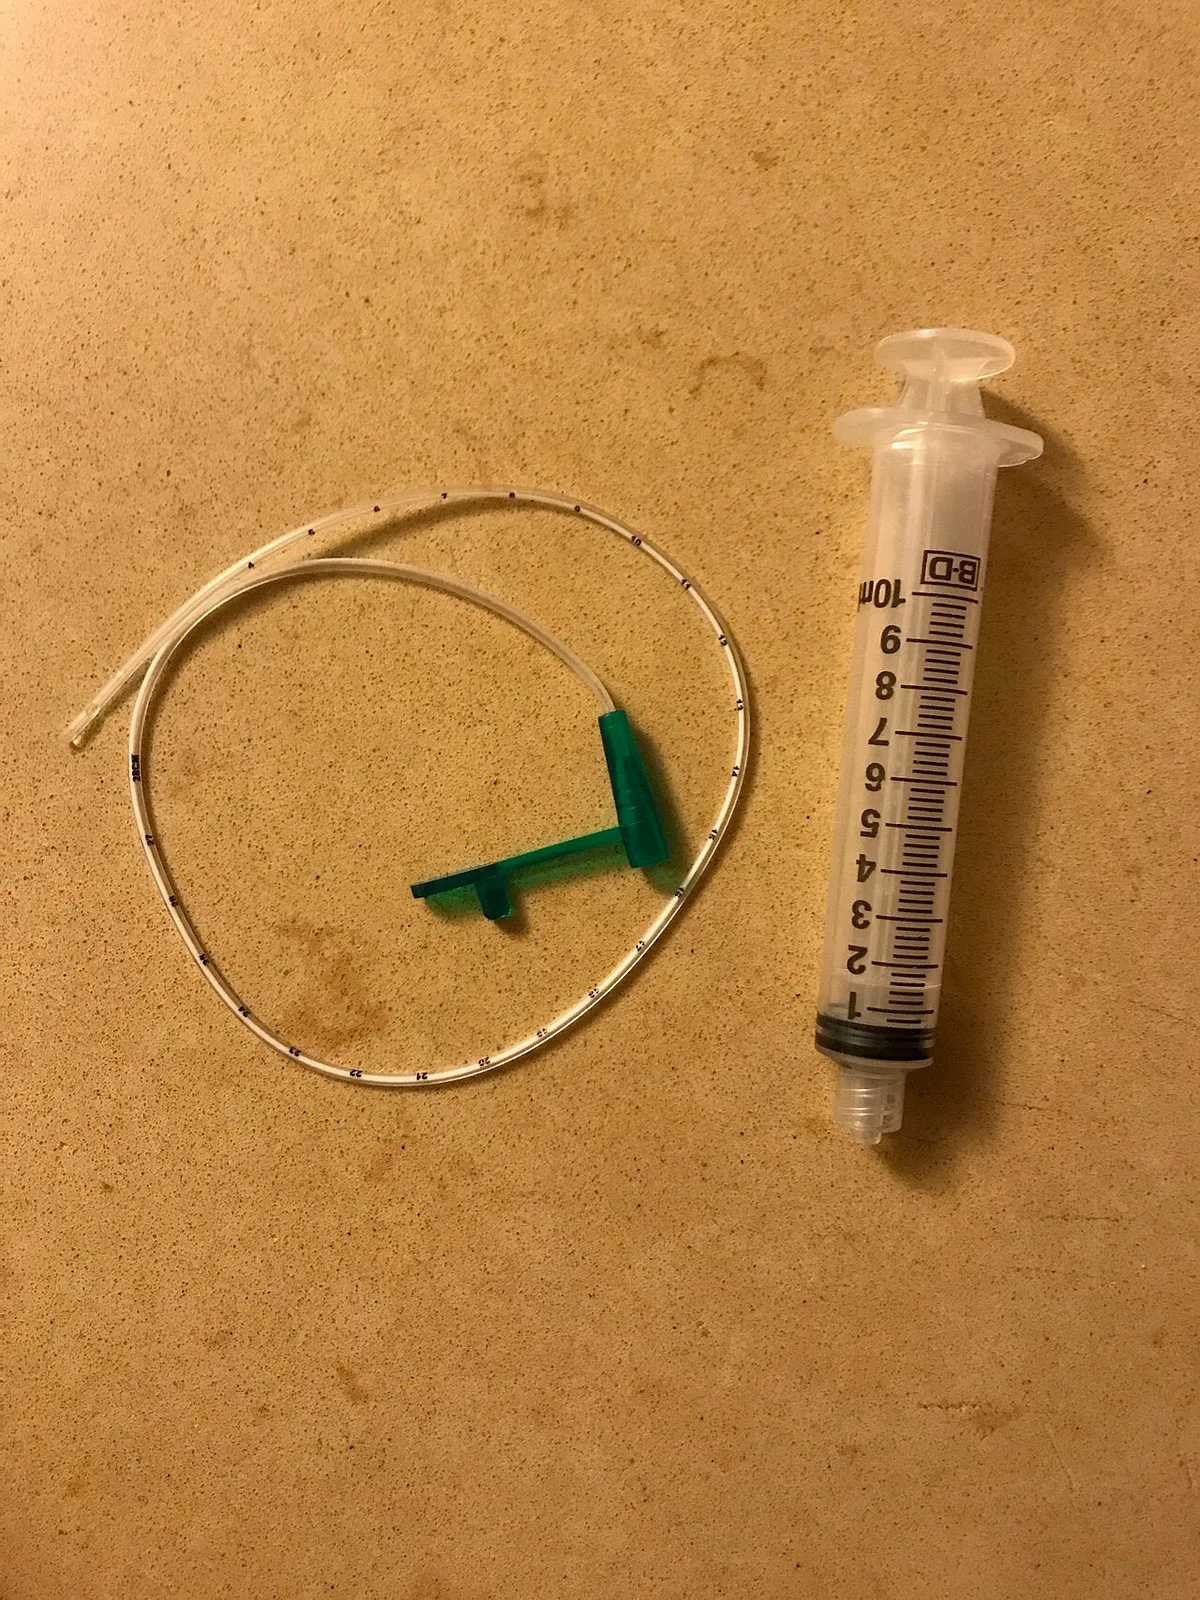
Image source: Wikimedia Commons / Samajama126 (CC BY-SA)
Quick Answer
Flush your feeding tube with 15, 30 mL of sterile water before and after each use. Clean the exterior with a damp cloth and mild soap daily. Wash the insertion site with saline or chlorhexidine per your doctor’s instructions.
Never reuse syringes. Replace supplies every 24, 48 hours. Call your healthcare team if you see redness, swelling, or pus around the site.
Why Cleaning Your Feeding Tube the Right Way Matters
A clean tube isn’t just about comfort, it’s the front line against infection and clogs. Bacteria love warm, moist environments, and the inside of a feeding tube is a perfect breeding ground if you skip a flush. A blockage can mean a trip to the ER for a replacement.
Then there’s the insertion site. Skin around a PEG or G‑tube can break down fast if it stays wet or dirty. That opens the door to local infections, which can spread to the bloodstream in people with weak immune systems.
When you stick to a routine, you extend the life of the tube itself. Silicone and polyurethane tubes can last months if you flush them properly. Neglect them and you might replace one in weeks.
It’s that simple, and that important.
What You’ll Need: Supplies and Prep
Gather everything before you start. Having it all in one spot keeps the process smooth and reduces contamination risk. Here’s the list based on what hospitals and home-care nurses recommend.
| Supply | Purpose | Notes |
|---|---|---|
| Sterile water | Flushing the tube | Use sterile (not tap) unless your doctor says otherwise |
| 60 mL catheter-tip syringe | Flushing and feeding | Replace every 24 hours if single-use |
| Mild soap and clean cloth | Cleaning the tube exterior | Pat dry, don’t scrub |
| Saline or chlorhexidine wipes | Cleaning the insertion site | Per manufacturer instructions |
| Clean gauze or dressing | Covering the stoma | Change if it gets damp |
| Tube brush (optional) | Deep-cleaning stubborn residue | Use carefully – a dedicated one like the PEG tube cleaning brush works best |
A note on syringes
Never use a syringe that’s been used for IV access. The Luer-lock tip can accidentally connect to IV lines and cause fatal air embolism. Stick to catheter-tip syringes designed for enteral use.
Storage tips
Keep all supplies in a clean, dry container. Don’t store them in the bathroom, moisture breeds bacteria. If you’re reusing a syringe, rinse it with sterile water immediately after each use and let it air-dry on a clean paper towel.
Replace it after 24 hours.
Step-by-Step: How to Clean Your Feeding Tube
Let’s break this into four clear phases. The whole routine takes about 5 minutes once you’re familiar.
Gathering Supplies and Hand Hygiene
Wash your hands with soap and warm water for at least 20 seconds. Don’t skip this, it’s the single most effective step. Dry with a clean towel or paper towel.
Then lay out your supplies on a clean surface.
Flushing the Tube
Draw up 15, 30 mL of sterile water into the syringe. Attach the syringe to the tube port with a gentle twist. Push the water slowly, pulse it by stopping and starting every few milliliters.
This creates pressure that clears residue better than a steady stream.
After flushing, remove the syringe and cap the port. Do this before and after every feeding or medication. For a tube that isn’t used much, flush every 4, 6 hours to keep it from drying out.
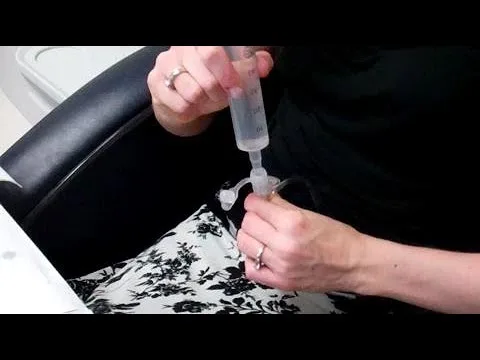
Image source: YouTube / Providence (YouTube thumbnail (fair-use with source credit))
Cleaning the Exterior and Insertion Site
Use a clean, damp cloth with a drop of mild soap to gently wipe the outside of the tube. Avoid alcohol or hydrogen peroxide, they can dry out the material and cause cracking. Pat it dry.
For the insertion site (the stoma), dip a clean gauze in saline or use a chlorhexidine wipe. Gently clean around the tube, moving outward in a circle. Don’t scrub.
Let it air-dry for a minute before applying a new dressing.
Storing and Reusing Supplies Safely
If you’re reusing a syringe, rinse it with sterile water immediately after use. Shake off excess water and let it dry on a clean paper towel. Store in a sealed container.
Replace after 24 hours or sooner if it looks dirty.
Never reuse a syringe that has touched formula or medication remnants, it’s a contamination risk. Many home-care programs provide single-use syringes, which simplifies things.
Flushing 101: Water Type, Amount, and Timing
This is where most people get tripped up, so let’s settle it.
Water type: For most healthy adults at home, tap water that’s safe to drink is fine, but only if your doctor says so. For anyone with a compromised immune system, infants, or if you’re unsure about your water quality, use sterile water. Boiled cooled water is a second-choice option, but sterile is best.
Amount: The standard flush volume for an adult is 15, 30 mL. Pediatric tubes need less, usually 5, 10 mL. Check your tube’s French size: smaller lumens need less pressure.
Timing list:
- Before each feeding to clear any residue
- After each feeding to push formula through
- After each medication (even liquid meds)
- Every 4, 6 hours if the tube isn’t in use
Pro tip: If your tube feels resistant when you’re flushing, don’t force it. Stop and try warm water. If that doesn’t work, use a dedicated feeding tube brush or call your healthcare team.
Cranberry juice and soda can damage silicone tubes, skip them.
Caring for the Insertion Site
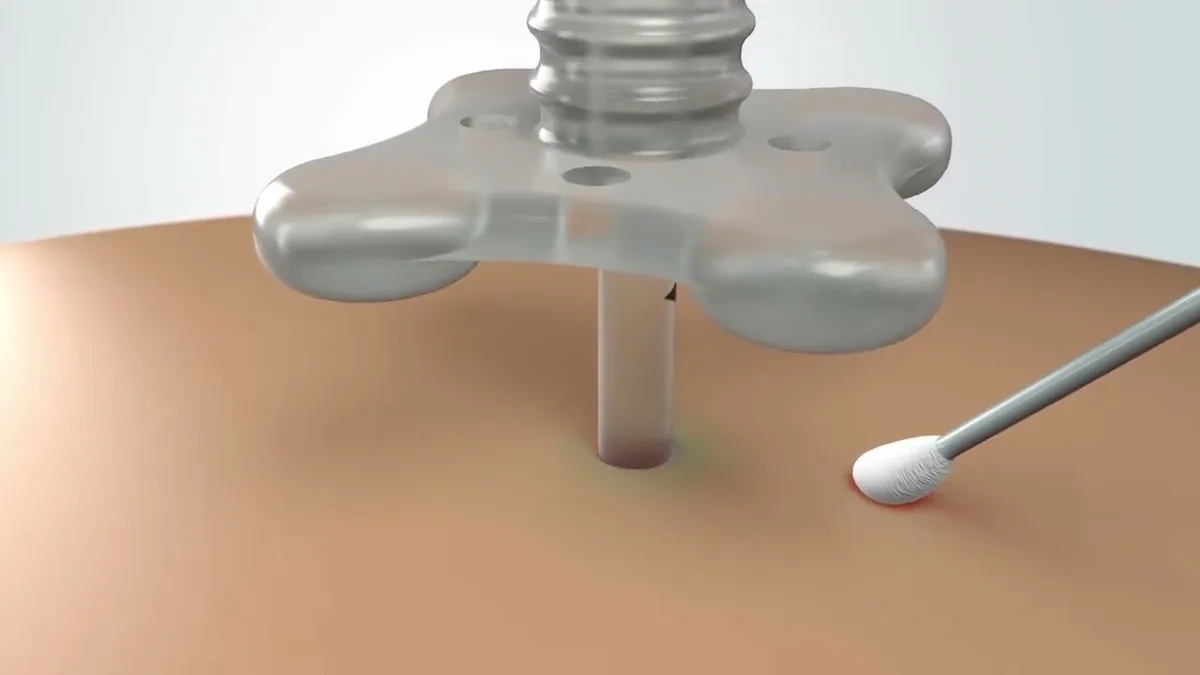
Image source: YouTube / Avanos Medical (YouTube thumbnail (fair-use with source credit))
The stoma, the hole where the tube enters the body, needs gentle care. Here’s how to keep it healthy.
Daily routine:
- Wash hands.
- Remove the old dressing.
- Inspect the site: normal is a pink, moist area with no discharge. Redness, swelling, or oozing means infection.
- Clean with saline or chlorhexidine gauze. Move in a spiral from the tube outward.
- Pat dry with a clean gauze.
- Apply a new dressing. Some tubes don’t need one if the site is healed, ask your nurse.
Watch for these signs:
- Yellow or green drainage
- Foul smell around the tube
- Hardness or tenderness around the site
- Fever without another cause
If any of those appear, call your healthcare team within 24 hours. Don’t wait for it to get worse.
Changing the tube: Most PEG tubes last 6, 12 months. Some need replacing sooner if the balloon leaks or the tube cracks. That’s a procedure for your doctor, never try to replace it at home on your own.
Common Mistakes That Can Cause Blockages or Infections
Even experienced caregivers slip up sometimes. Here are the most frequent errors and how to avoid them.
Skipping the pre-use flush. You might think the tube is empty from last time. But formula residue dries into a hard crust inside the lumen. That crust is what causes blockages.
Always flush before and after every use, even if you just did it an hour ago.
Using tap water when sterile is needed. If the patient has a weak immune system or is under two years old, tap water can carry bacteria that cause serious infections. Per CDC enteral feeding guidelines, sterile water is the safer choice for vulnerable individuals. When in doubt, use sterile.
Reusing syringes too long. A syringe that sits for hours with formula residue is a bacterial breeding ground. Rinse it immediately with sterile water after each use. Replace it every 24 hours.
Some home-care programs provide single-use syringes for this reason.
Forgetting to clean the exterior. The outside of the tube collects dust, food particles, and bacteria. A quick wipe with a damp cloth and mild soap each day keeps it clean. Don’t let residue build up where the tube enters the stoma, that’s a direct path for infection.
Pushing too hard when flushing. If you meet resistance, stop. Forcing water can damage the tube or push a blockage deeper into the stomach. Try warm water first.
Then try a gentle pulsing motion. If that doesn’t work, use a dedicated tube brush, just like the ones you’d use for routine upkeep, a proper cleaning tool can clear residue without causing damage.
Ignoring small changes at the insertion site. A little redness might not seem urgent. But redness followed by swelling or drainage means infection has already started. Early intervention is simple.
Waiting turns it into a hospital stay.
When to Call Your Healthcare Team
Some problems you can handle at home. Others need a professional. Here is a clear breakdown.
Call your doctor or nurse within 24 hours if you notice:
- Redness spreading more than an inch around the stoma
- Yellow or green discharge with an odor
- Pain or tenderness around the tube site
- Fever over 100.4°F without another clear cause
- The tube seems loose or the balloon feels deflated (for balloon-retained tubes)
Go to the emergency room immediately if:
- The tube comes out completely and you cannot reinsert it
- You see bright red blood around the site or in the stomach contents
- The patient has trouble breathing or chokes during feeding
- You suspect the tube has migrated into the abdominal cavity (uncommon, but the tube suddenly becomes hard to flush and causes severe pain)
What about a clogged tube? Try warm water and gentle pressure first. If that doesn’t clear it within 15 minutes, call your home care nurse. Some can come out and use a mechanical declogger.
Do not use a wire hanger or sharp object, that can puncture the tube or the stomach lining.
A note on tube replacement. Most PEG tubes last 6 to 12 months. If the tube cracks, leaks, or the balloon fails, you need a doctor to replace it. Never attempt to change a tube at home on your own.
The stoma can close within hours, and replacing it incorrectly can cause serious internal injury.
The Truth About Home Remedies (Cranberry Juice, Soda, Vinegar)
You might hear tips from well-meaning friends or online forums. Here’s the real story.
Cranberry juice and soda. These are acidic. They can damage silicone tubes over time. They also leave sugar residue that bacteria love.
Multiple studies and manufacturer warnings advise against using them for tube cleaning. Stick to warm water.
Vinegar. A diluted vinegar soak is sometimes used for deep cleaning reusable supplies. But never flush vinegar through the tube itself. It can irritate the stomach lining and interact with medications.
If you need to disinfect, use a product specifically designed for enteral equipment.
Enzymatic decloggers. Products like Viokase (a pancreatic enzyme mix) can break down formula residue. These are safe when used correctly. But they require a prescription in many places.
Always follow the manufacturer’s instructions and never substitute with meat tenderizer or similar kitchen products.
Coca-Cola for clogs. This is an old nursing trick. It sometimes works because the carbonation helps break up clogs. But the sugar and acid can damage the tube and feed bacteria.
Most hospitals now avoid it. Warm water and a gentle pulsing flush are safer and just as effective in most cases.
Bottom line: If a home remedy is not recommended by your healthcare team or the tube manufacturer, skip it. The risks outweigh the benefits.
Maintenance and Tube Lifespan
A well-maintained tube can last months. Neglect shortens that dramatically.
| Tube Type | Typical Lifespan | Replacement Method |
|---|---|---|
| PEG (G-tube) | 6–12 months | Endoscopic or percutaneous removal |
| NG tube | 4–6 weeks | Pulled out and replaced at bedside |
| NJ tube | 4–6 weeks | Usually placed under fluoroscopy |
| Balloon-retained G-tube | 3–6 months (balloon replacement) | Balloon can be changed at bedside |
What wears out first. For silicone tubes, it’s usually the internal surface. Microscopic cracks form from repeated flushing and formula residue. These cracks harbor bacteria and can cause clogs.
Polyurethane tubes are more resistant but still need regular replacement.
Signs your tube needs changing:
- The tube feels brittle or has visible cracks
- Leaking around the stoma despite proper inflation
- Persistent clogging that can’t be cleared
- Balloon volume needs constant topping up
- The external bumper or retention disc is damaged
How to extend tube life.
- Flush consistently with sterile water after every use
- Avoid acidic or sugary liquids in the tube
- Clean the exterior gently each day
- Store supplies in a dry, cool place away from sunlight
- Replace syringes and connectors regularly per manufacturer guidelines
Routine checkups. Your healthcare team should inspect the tube and stoma every three months. They can spot early signs of wear or infection that you might miss.
FAQs from Real Caregivers
How often should I flush the tube if it’s not in use?
Every 4 to 6 hours. This prevents formula residue from drying and clogging the tube. If the tube is capped between feeds, a quick flush with 15 mL of sterile water keeps it clear.
Can I use a straw cleaner or pipe cleaner to clean the tube?
No. Straw cleaners are too abrasive and can scratch the inner surface, creating spots where bacteria thrive. Use a brush designed for feeding tubes or a soft, dedicated cleaning tool.
What’s the best way to clean a syringe for reuse?
Rinse immediately with sterile water after each use. Shake out excess water. Let it air dry completely on a clean paper towel.
Store in a sealed container. Replace after 24 hours. Many guidelines now recommend single-use syringes to reduce infection risk.
My tube feels hard to flush. What should I do?
Stop pushing. Try warm water in a pulsing motion. If it doesn’t clear within 5 minutes, soak the tube with warm water via the flush for 10 minutes.
Then try again. If still blocked, call your home care nurse. Do not use force.
How do I know if the stoma is infected?
Look for redness spreading more than an inch around the site, yellow or green discharge, foul odor, or pain when you touch the area. Fever without another cause is also a red flag. Call your doctor within 24 hours if you suspect infection.
Can I clean the tube with alcohol or hydrogen peroxide?
No. Both can dry out the silicone or polyurethane material, causing cracks. They also irritate the stoma skin.
Stick to saline, chlorhexidine wipes, or mild soap and water for the exterior.
That covers the routine from start to finish. Keep this guide handy, and you’ll handle tube cleaning with confidence every time.